http://www.geocities.jp/stick_junkee/modstick1.html
Introduction of remodeling stick
When the Virtua Fighter has been launched in PS2, dedicated stick was released at the same time from Hori.
However, even fewer people that were not convinced on the lever should did not.
When you are thinking I am also one of them, "Do not be the same as is used lever and in the arcade",
I thought to discover the virtual stick late type for Sega Saturn used that are sold in about 300 yen.
"Oh, whether ~ should I modify this"
but is why I made in not What,
seems out what that is, "reprint Virtua Stick for PS2", even it be of that in wearing the Sanwa lever So
we will introduce My stick is I think a good opportunity.
It is currently also has RAP, but to the virtual and Z Gundam is easy to do better over here.
RAP Other games (games that you want to use 5 button more than more of the RAP is Yo-sa-ge) uses to.
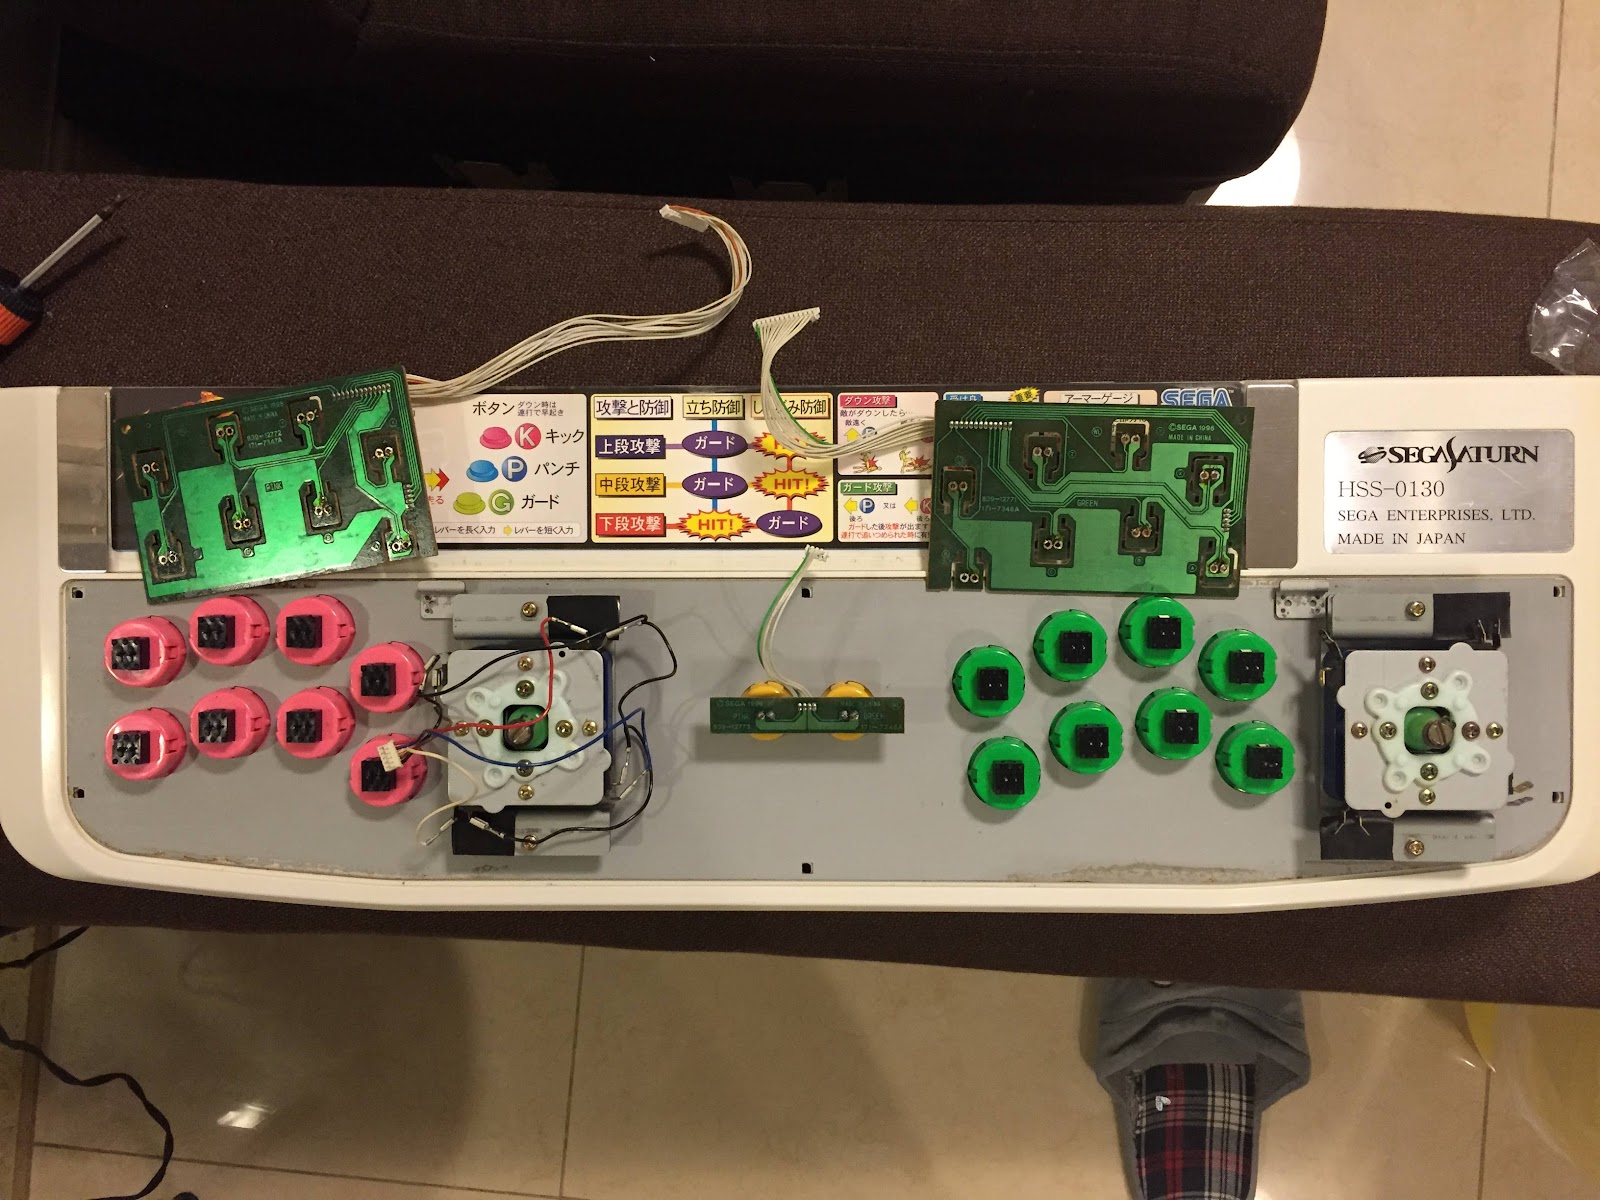
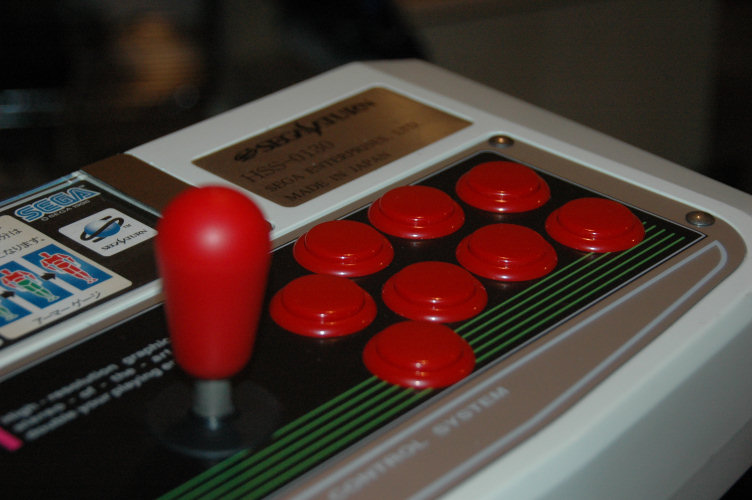
First this. Unit 2 My own stick
Why say from Unit 2. Unit 1 is been ported only top plate in Unit 3,
because it is currently in renovation preparation, now is the decomposition state


Let's take a look at the inside. And say if you have to for a PS doing, it is guy so-called "substrate hijacking method".
Substrate that is used is the controller SCPH-1080 of PS genuine.
It is sold at about 100-300 yen in Chuko-ya and junk shop like a Toko (hard off, etc.).
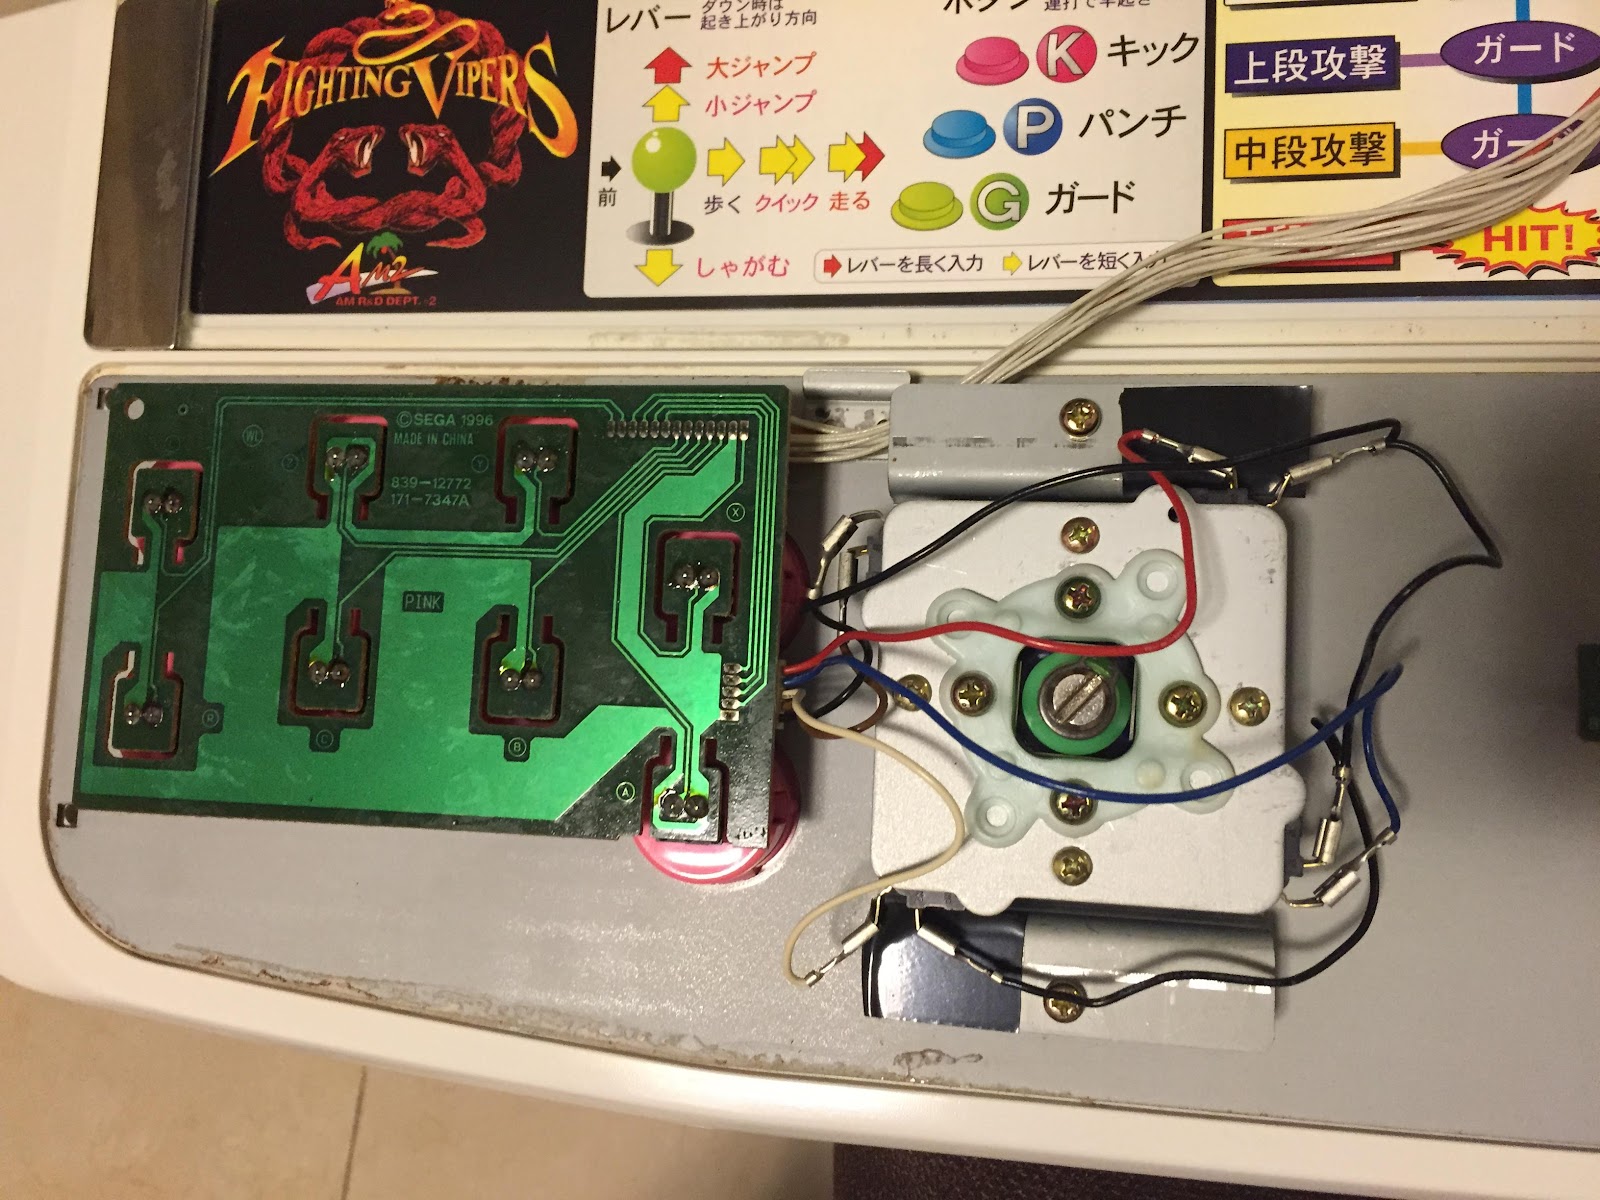
And that it called in but is lever was the largest theme in private "use the same lever as the arcade", we used made Sanwa electronic "JLF-TP-8".
Harness that connects to the lever that had been connected to the default lever of Virtua stick was not necessary because as it is available.
Button is also Sanwa Denshi as "OBSN-30", "OBSF-30".
Start and select button is a small button of about 100 yen which is sold at so of home improvement.
Let's then take a look at the attachment of the lever.

Originally have drilled a hole in the 4 cm square to lever mounting portion of the top plate of the Saturn Virtua stick,
there ASCII made lever (this is the worst possible) or made Seimitsu as "LS-56-01" Omowashiki lever has is mounted. (By the way, was unlucky to Unit 1, made of ASCII (;'Д `) 2 Unit, Unit 3 was made Seimitsu)
does not attach lever of Sanwa in this state.
So I was prepared precision made lever used that we have received from the term direction "LS-55-01". For there this "VS-based"? Was decided to use the null ones.


When someone look at the pictures I think you can see able, but this stays and control panel in a hole opened in the same 4 centimeters square and top plate of the Virtua Stick with stays for mounting such as this lever, such as made Sanwa, Sanwa of lever the hole in the same interval as the mounting holes have been drilled.
By utilizing this Attach the Sanwa of the lever.

First, the fixed screws to be used for later secure the lever Sanwa the stay, and then fix the stay to the top plate of the virtual stick.
In this case it is to fix the stay with screws and nuts, but the nut and Sanwa lever protrudes from the stay
has been used with a washer in order to match the height of the nut for fixing the screw which is attached to fixed.
Is also screws for fixing the top plate rough the stay and I cut to match the length,
but still showed that or too jump out from the nut, it is cut with a metal file.
By the way, the control panel of Virtua Fighter 4 genuine height of from Konbane back of the surface to the lever mounting stays
because it was about 8mm I is matched to its height. I saw by attaching a lever of Sanwa in such upon. You will like this. To mounting strength has been pretty firmly, is the replacement of the lever also easy when lever is Tsu calyx.


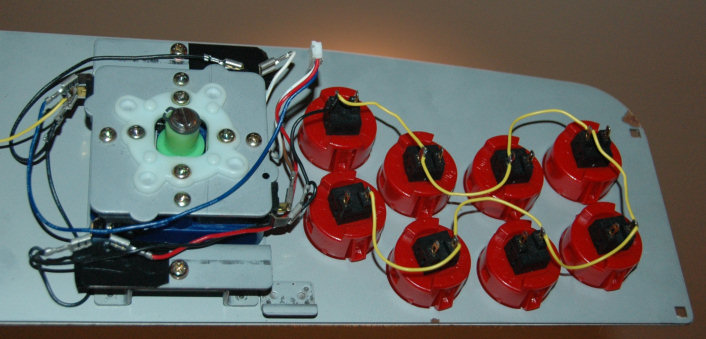
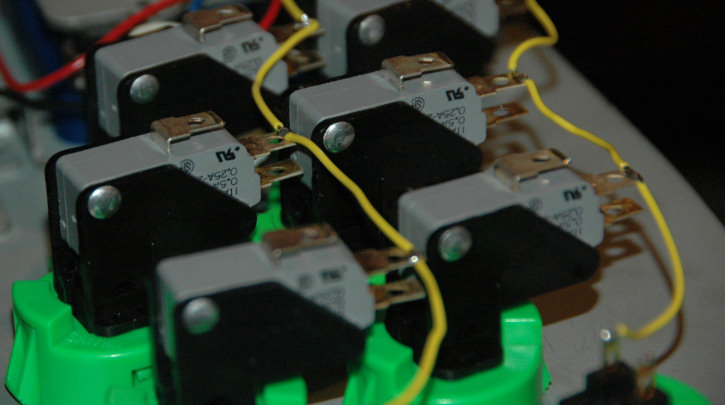
Next is the button, but the button that is attached by default to Virtua stick back is soldered to the substrate,
it has become in this way When you take them remove the button. Since the diameter of the hole itself, such as 28mm in on something or disturbing projections are out, the same button as the arcade in this state I will need to be processed because it does not enter. First of all, we spread the hole itself up to 30mm in the way of projections from the cut in Handonibura over in chassis reamer. After processing, I was now comfortably also enter button for arcade.


Incidentally sheet that had been stuck to a panel was attached in the 2-ply new cutting sheet was peeled off.
Cutting sheet itself was used having a high weather resistance can also be used to such as car exterior and signs.
You have passed the fabricated to from more than two years, but the degradation is not felt almost.


This is the Unit 3 that made it are stimulated after I bought a RAP.
Now I was on the same button as the start and select buttons and an arcade.
Because even fire function with pad foundation you use them to takeover, originally to Virtua stick
it tried to be able to also set fire function by using the switch on.
In guy top plate that was originally used in Unit 1, was stick to Sanwa, the only place remove the default button
because RAP default buttons that were removed from the RAP was just entered, we use it.
The peeling sheet that had been stuck on the panel surface, was superimposed on the first cutting sheet translucent PVC sheet with any RAP thereon.
Although I thought that it or attempt to open the rear two holes in the stage of the bottom in order to future appointments Astro-style arrangement,
reprint Virtua Stick for PS2 will decide to wait and see what button placement
SS Virtua Stick (late type) Unit 3 Astro flavor
Drilling and new button hole in order to the top plate for Unit 3, which had been a long time left in the Astro-style arrangement
was done the usual Sanwa lever mounting remodeling.
Side already use the remodeling already Unit 3 of the side.
(Refurbishment of Unit 1 of the side that has left over only was troublesome but ... which is trying to do ...)
First I will remove all the parts of the top plate. Button lever and seat that is attached to the surface too.
Peel the sheet is quite tedious work, but peeling sheet on the first best, is persistently peeling remaining paper with an adhesive under the
Peel Very Berry by easy to peel off the wet, etc. spray Because there.
Then you go up much remains thin adhesive, but to remove the adhesive with a peel commercially available adhesive that is sold in as benzene and home improvement how much up there.
Once clean the top plate surface,
Unit 2 Introduction to cut the nails that are sticking out of the existing button hole as it was done in such as such as in Handonibura over
you waged in reamer until the button for arcade enters. This also is an arduous task and applied to all eight but button hole.
And I make the positioning of the button hole to open the new Once it is finished. The photograph is a top plate back.

After positioning the hole Nari hole saw chassis - Open with Nari punch.
I was opened using the chassis punch, but there are advantages and disadvantages to the hole saw, chassis punch both.

Next is the lever stays, but there is also a place where you are somewhat elaborate so went past this remodeling twice.
First to VS base for LS-55-01 it is to fix the screw for Sanwa lever mounting, but
the How do you use the screws to tighten in the usual + driver until the last time, this time it is not that (almost loose But)
to be able to tighten than ever after mounting a stay on the top plate, and also was used the hex bolt to tighten purely tightly. Furthermore nut was also using the V nut prevent loosening.

And Although it is mounted to the top plate of the stay, again use a flat head screw with a hole for the hex wrench rather than a screw for ordinary + driver,
nut normal high slack prevention also including nylon to than nut I've used the nut.

Here while Measure the height and height of the nut of stay fixed nut of the lever fixing bolt, the protruding portion of the screw of stay fixed
to match the height is or cut with a file. I was to be lower the lever fixed portion about 0.5mm.

When you have finished shaving you look at actually mounting the lever. Lever head of fixing hexagon bolt between the top plate and the stay in when temporary set
but I was floating from slightly top plate, touching just the top plate is actually tighten the screws when mounting a stay in the top plate It was the good feeling is enough.

Paste the cutting sheet on the top plate surface When you come up here and I only attach to the side, but in my case the cutting sheet to double
it is the paste, but the top plate front when you paste cutting sheet of the first sheet side wrap the sheet to the back side.
This is due to the rust prevention of the top plate. Is rust easy as in Unit 1 of the top plate per placing a hand when it is easy to write sweat on hand, such as summer
had rust around to put the right hand.

By the way, cutting sheet that my used were
Nakagawa chemical thing's. Very quality well Unit 2 was passed more than three years from the circle to create, but
it does not feel the most deterioration. Is recommended.
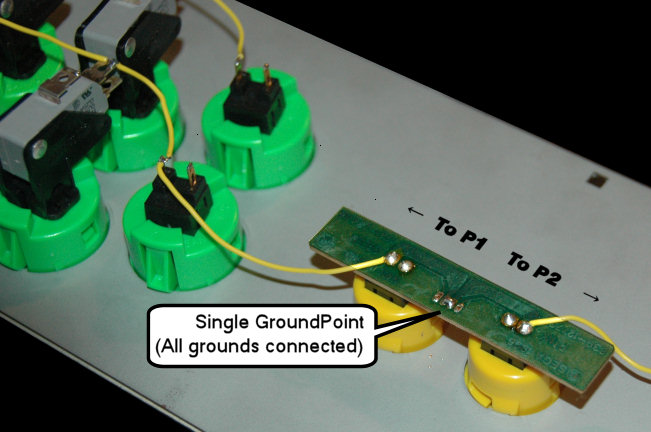
After that you can the also mounting wiring button lever is attached to the side.
This time the button
Precision Industry I've used made PS-14-GN.

In is complete.
Button assignment × upper row from left ○ L1R1, is lower from the left □ △ L2R2.
The lower left of cosmetic screw white here is because so easy to rust hit the hand instead of cosmetic screw you are using nylon rivets.

Because I think in the remodeling using the original top plate of the Virtua stick ended up until the final form,
you may only have another self-made top plate after this.
http://pineconeattack.com/2008/12/07/how-to-mod-the-hori-fighting-stick-ex2-with-authentic-arcade-parts-xbox-360-version/
https://www.youtube.com/watch?feature=player_embedded&v=m4Ha2uphm38
Go back